2. Getting Started with Terraform Import
Step-by-step guide to using terraform import, prerequisites, setup, and common challenges.
🔰 Getting Started with Terraform Import
In the previous post 🛠️ Introduction to Terraform Import and Refactoring, we discussed the importance of Terraform Import in managing existing cloud resources and the need for refactoring Terraform code for better scalability. We also introduced the concept of Infrastructure as Code (IaC) and its significance in modern cloud operations.
This foundation sets the stage for our next step: diving into the 🚦 Getting Started with Terraform Import.
Before diving into the details of Terraform Import and refactoring, let’s take a closer look at the 🏢 ABC Corp environment to understand why importing and refactoring resources is necessary.
🏢 ABC Corp’s IaC Evolution: Bringing Infrastructure Under Control
Scenario Overview:
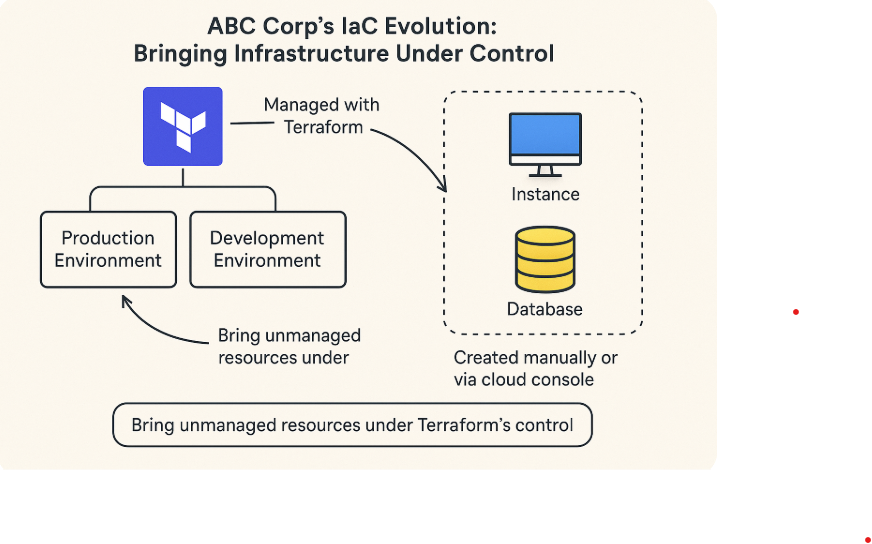
ABC Corp has multiple environments (production and development), and their infrastructure is managed using Terraform. However, during their ongoing migration from on-premises systems to the cloud, certain resources were created manually or via the cloud console, outside of Terraform’s management. This creates the need to bring those resources under Terraform’s control to ensure they are properly managed going forward.
Infrastructure Overview:
- Platform: Terraform Cloud (or CLI for local management).
- Environments: Two environments, prod and dev, each with dedicated Terraform workspaces (
prod-abc-app,dev-abc-app). - Repositories:
- Root Module Repositories: Contain environment-specific Terraform configurations.
- Module Repository: Hosts reusable modules for AWS services (e.g., EC2, RDS, VPC).
Day 1 Provisioning: Infrastructure is provisioned through a GitOps workflow, using Terraform to ensure automated deployments.
Current State of Operations
- Day 2 Operations:
- Performed manually or through “click ops” (cloud console/CLI).
- Resources created during ongoing on-premises migration are not tracked in Terraform.
- Challenges:
- Drift: Manual changes lead to discrepancies between the live environment and Terraform state.
- Risk of Impact: Teams avoid modifying Terraform configurations to prevent production issues.
- Stale Configurations: Terraform codebases and workspaces are outdated, no longer reflecting the current infrastructure.
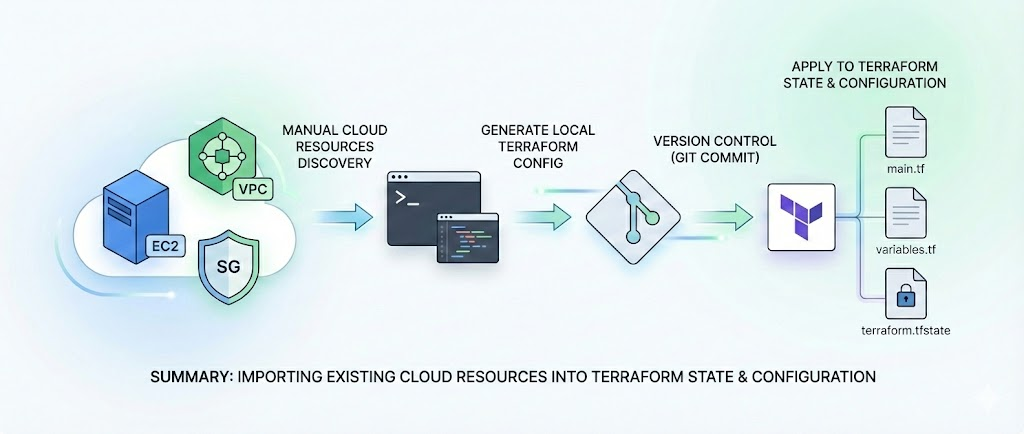
🏗️ Import Flow - Way Forward
The following workflow outlines how ABC Corp systematically approached the import process to align their resources with Terraform, integrating automation and GitOps principles to maintain efficiency and reliability.
The workflow operates across four layers:
- ☁️ Cloud: Read-only credentials fetch resource details from providers like AWS, Azure, or GCP.
- 💻 Local Machine: Scripts or tools generate import blocks, initialize Terraform, and create HCL configurations. The process includes validation and cleanup until successful.
- git: Validated configurations are pushed to a repository. Pull requests are reviewed, fixes applied, and import tags added.
- 🚀 Terraform Enterprise/CLI: Terraform jobs are triggered to plan and apply changes, ensuring resources are fully imported and managed by IaC.
⚙️ Prerequisites and Setup
Before using Terraform Import, ensure you have the following prerequisites and setup:
🔑 1. AWS Account Setup
- ✅ Ensure you have an active AWS account.
- 🔑 Create Access Keys:
- ➡️ Go to IAM > Users in the AWS Console.
- ➡️ Select your user, navigate to Security Credentials, and generate an Access Key ID and Secret Access Key.
⚙️ Configure AWS CLI:
1
2
3
4
5
aws configure
AWS Access Key ID [****************4NXU]:
AWS Secret Access Key [****************bfsD]:
Default region name [eu-west-1]:
Default output format [None]:
or use the following command to set up your AWS credentials and default region.
1
vi ~/.aws/config
Provide:
- 🔑 AWS Access Key ID
- 🔑 AWS Secret Access Key
- 📍 Default Region (e.g., us-east-1)
- 📄 Output Format (default: json)
Verify Setup:
1
aws sts get-caller-identity
This command should return your AWS account ID and ARN, confirming that your AWS CLI is correctly configured.
1
2
3
4
5
{
    "UserId": "AROA4KOIXDFR4BRNJ56H5:EXAMPLE",
    "Account": "3123456789012",
    "Arn": "arn:aws:sts::3123456789012:assumed-role/ExampleRole/EXAMPLE"
}
💻 2. Install Visual Studio Code
- ⬇️ Download and install VS Code
- 🔌 Install the Terraform Extension for syntax highlighting and linting.
🧰 3. Install AWS CLI
⬇️ Download AWS CLI from the official guide.
Verify installation:
1
aws --version
🐍 4. Install Python and Libraries
⬇️ Download Python 3.x from python.org.
Verify installation:
1
2
3
4
5
# Use python3 to check the version
python3 --version

# Output should be similar to:
Python 3.10.12
1
2
3
4
# Use pip3 to check the version
pip --version
# Output should be similar to:
pip 22.0.2 from /usr/lib/python3/dist-packages/pip (python 3.10)
Install required libraries:
1
2
3
4
5
6
7
8
9
10
11
12
13
14
15
# Install boto3 for AWS SDK
pip install boto3

# Output should be similar to:
pip3 show boto3
Name: boto3
Version: 1.24.69
Summary: The AWS SDK for Python
Home-page: [https://github.com/boto/boto3](https://github.com/boto/boto3)
Author: Amazon Web Services
Author-email:
License: Apache License 2.0
Location: /home/rjoshi/.local/lib/python3.10/site-packages
Requires: botocore, jmespath, s3transfer
Required-by:
1
2
3
4
5
6
7
8
9
10
11
12
13
14
15
# Install loguru for logging
pip3 install loguru

# Output should be similar to:
pip3 show loguru
Name: loguru
Version: 0.7.2
Summary: Python logging made (stupidly) simple
Home-page: [https://github.com/Delgan/loguru](https://github.com/Delgan/loguru)
Author: Delgan
Author-email: delgan.py@gmail.com
License: MIT license
Location: /home/rjoshi/.local/lib/python3.10/site-packages
Requires:
Required-by:
🧱 5. Install Terraform
⬇️ Download Terraform from the official website.
Verify installation:
1
2
3
4
5
6
# Use terraform to check the version
terraform --version

# Output should be similar to:
Terraform v1.9.0
on linux_amd64
📂 6. Git Repository Setup
📂 Clone the repository:
1
2
git clone <repository-url>
cd <repository-folder>
🌿 Use Git to manage Terraform configurations.
☁️ 7. Workspace Setup
Using Terraform Cloud:
- ☁️ Log in to Terraform Cloud.
- 🛠️ Create a new Workspace:
- 🏷️ Name the workspace based on your environment (e.g., prod-app-xyz).
- 🔗 Link your Git repository to the workspace for automated plan and apply workflows (valid only if using VCS-driven workflow).
⚙️ Configure
main.tfwith the remote backend:1 2 3 4 5 6 7 8 9
terraform { backend "remote" { organization = "your-org-name" workspaces { name = "your-workspace-name" } } }
📦 7.1 Backend Configuration (Optional)
If using a remote backend like S3, configure main.tf as follows:
1
2
3
4
5
6
7
8
terraform {
    backend "s3" {
        bucket          = "your-terraform-state-bucket"
        key             = "path/to/your/statefile"
        region          = "us-west-2"
        dynamodb_table  = "terraform-lock-table"
    }
}
🔍 8. Validate the configuration for all the installed tools and libraries:
1
2
3
4
5
6
7
8
9
terraform --version
aws --version
python --version
pip3 --version
pip show boto3
pip show loguru

# AWS configure to connect with AWS account
aws configure list
🚀 What’s Coming Next in the Series
In the following posts, we will dive deeper into the Practical Example of Importing AWS EC2 Instances to see the step-by-step process to complete the import work.
Part 3: Practical Example of Importing AWS EC2 Instances
- Hands-on example of importing an AWS EC2 instance.
- Managing imported resources with Terraform state.
Stay tuned as we continue to explore the power and versatility of Terraform Import in transforming cloud infrastructure management at scale!
📝 Conclusion
Managing infrastructure at scale is no small feat, but with tools like Terraform Import, teams like ABC Corp can gain control over their cloud environments and lay the groundwork for streamlined, automated workflows. From bringing unmanaged resources under IaC control to implementing scalable configurations and best practices, the journey to IaC maturity is both challenging and rewarding.
In the upcoming posts, I’ll be diving deeper into the practical and advanced aspects of using Terraform Import, covering everything from step-by-step guides to best practices for managing large-scale cloud environments.
Let’s take this journey together and bring your infrastructure under control—efficiently, reliably, and at scale! ``` Catch you later, code Ninjas! Happy Codifying! ⚙️💻🚀